Presumably, by the time you’re reading this you will have gathered some soil, containers, and seeds. Great! Good job! Now you’re gonna need a place to put all of this stuff so you can begin your growing journey. Back in the earlier days of prohibition most people would dedicate an existing room in their house or section off part of a room by framing out walls to contain their growing environment. Nowadays, most of us just throw up a grow tent. They are readily available and super easy to put up and take down as needed. Of course, you can still choose to grow in any room you wish to and most of the information contained in this grow guide will still pertain to you if you forgo buying a tent.
Grow Tents
What size and what brand tent should I get?
When choosing what tent size to get you need to consider what your goals are and how much space you have available. With a 4’ x 4’ tent and SCRoG (screen of green) training it’s possible to yield 1-2 pounds of dried cannabis after dialing in your growing style and environment. Generally, I usually recommend that people grow in a 4×4 tent but if you don’t think you’ll need that much finished product for your personal use, then pick a tent that’s more suited to your needs. Plenty of people grow high quality cannabis in a 2’ x 4’ or even a 2’ x 2’ tent.
After settling on what size tent you’d like to grow in, you’ll need to choose from a seemingly endless lineup of brands. One tent brand that continuously shows up on growers’ dream lists is Gorilla Grow Tents. They are definitely some great tents to use and if your budget allows for spending the extra money they demand then I’d definitely recommend them for the density of the fabric, reliability of light-proofing, ease of zipper operation, and ability to extend the height of the tents with the height extension kits they include. With that said, there are still some cheaper brands that work very well and I’ll list a couple of those after we go over a few important factors.
There are certain specifications that you want to look out for when choosing a tent:
- Fabric thickness is a crucial factor and probably the most confusing spec to consider. Most tents vary in thickness from 100D-600D with a few premium brands like Gorilla Grow Tents coming in at 1680D. The “D” in those measurements stands for “denier” and is a measure of the density of the fibers. The higher the number, the greater the density. Always go with the highest density you can afford and be weary of cheap tents with super low density ranges.
- Weight limit – Most grow tents are constructed of metal tubing which snaps together to form the support skeleton of the tent. Always make sure to check the weight bearing specs of any tent you’re considering to make sure that it will be able to support your equipment.
- Doors, duct ports, and cable ports – I personally prefer tents that have doors all over the place. I want to be able to open the whole thing and access my plants from any side. There are certain brands that only have one or two zippered doors. I prefer tents with at least three. This is personal preference but definitely something to consider. Also, check the duct ports and cable ports to make sure they are double-cinching ports to block out light.
After reading about every possible brand under the sun and visiting every growing forum on the internet I’ve come to the conclusion that every tent has its ups and downs. With that said, for the durability of the build, light blocking ability, reflectivity of the inside walls, and the relatively low price compared to premium tents, I highly recommend Vivosun tents. If you have a BIT more money to put towards a tent, then AC Infinity is the way to go as they have a super sturdy support frame and high density fabric that rivals the higher end Gorilla Grow Tents. Both Vivosun and AC Infinity tents will get the job done and you’ll have some extra money to put towards something that is infinitely more important: your grow light.
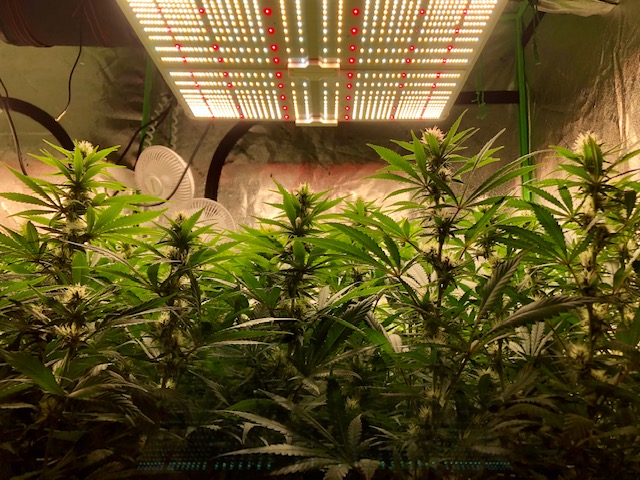
GROW LIGHTS!!!
Let’s be honest. Grow lights are f@#king awesome. We love them. We love talking about them and we love looking at them. They’re cool as f@#k. I’m not sure that there are many things more exhilarating than turning on a high powered grow light and staring into the solar abyss (don’t do that! It will damage your eyes). Alright, I feel better now. Moving on.
Back in the day (like 5 or 6 years ago) HID (high intensity discharge) lamps were pretty much the only viable option for growing cannabis indoors. HPS (high pressure sodium) bulbs with bulky ballasts and intense heat output coupled with high energy use were the norm. And don’t get me wrong, people have used, and continue to use HID lamps because they are highly effective at growing cannabis. But with the LED grow light technology advancing leaps and bounds in just a few short years, they are now the go to light source for most home growers because of their high efficiency and low heat output.
LED grow lights consume much less electricity and their intensity rivals HID. Because of the risk of fire and/or burns while using HID lamps, I will only be recommending LED grow lights here. I’ve used both and I LOVE my LED lights and the yields I’ve been able to achieve with them.
When shopping for grow lights, it’s important to look for certain specifications that many producers intentionally hide and misrepresent. And, always remember that if the price you’re seeing on a potential light seems too good to be true, it probably is.
Grow Light Specs to Look For:
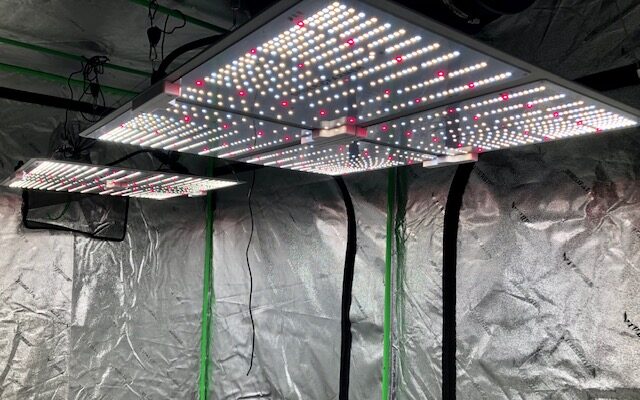
- Draw Power is the actual wattage that your light will draw at the wall. Many companies will attempt to misrepresent their lights by giving them names with numbers like “1000” in the title when their light is actually only drawing 100 watts at the wall. You will be sorely disappointed if you attempt to grow in a full 4×4 tent with a 100 watt light. Generally speaking, you need about 32 watts of power per square foot of growing space.
- PPFD (Photosynthetic Photon Flux Density) is a measure of the amount of light photons (measured in micromoles per second) that will actually be hitting your plant canopy and is influenced by light height. This is probably the most important bit of information to consider when buying a light. Most manufacturers will offer a map that lays out measurements of PPFD at varying light heights. You will need between 600-900 umol (micromoles) during flowering.
- Coverage Area is often suggested by most grow light manufacturers, and is sometimes exaggerated, but nonetheless useful information. Companies will tell you what size space they recommend their lights for so you can get a quick idea of whether or not they’ll work for your situation.
- Light Spectrum is pretty much limited to “full spectrum” in most newer LED lights. But there are still some older lights which focus heavily on the blue and red spectrums which produce a purple looking light that led people to refer to them as “blurple” lights. Full spectrum lights generate a whiter light that encompasses a wider spectrum more like sunlight and is generally recognized as more favorable to plant growth.
Always do your due diligence in researching light brands before pulling the trigger on a light and don’t always go for the cheapest OR the most expensive light. There are many brands that produce high quality lights at affordable prices. I always recommend Spider Farmer lights as they are highly efficient and reasonably priced for what they’re delivering. I’m currently running two of their SF4000 models, one SF2000, and one SE5000. So far I’m VERY happy with them.
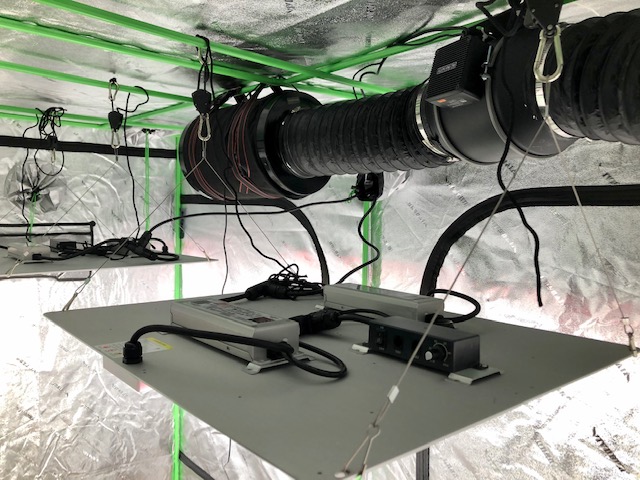
Exhaust Fans
After settling on which grow light to buy you’ll need to focus on what to do about the heat and humidity that will be accumulating inside of your grow area. Temperature and humidity play a huge role in the overall health of your plants and must be constantly kept in check with an in-line exhaust fan.
An in-line fan will pull air through a carbon filter and then outside of your tent. As this happens, new air will be sucked into the passive intake vents located on the bottom of your tent and replace the exhausted air.
When considering which size fan to buy you’ll need to consider a few variables:
- Size of grow space
- Heat output from lights
- Length of ductwork
- Reduction of efficiency from use of carbon filter
The efficiency of an in-line fan is measured in CFM (Cubic Feet per Minute). The CFM number tells you how much air in a space can be exchanged completely in one minute. To find out what the required CFM would be for your space, measure the space in feet and then multiply its length by its width and height.
For instance, a tent that measures 4x4x8 will require AT LEAST 128 CFM. Most of the time it’s better to oversize your fan a little bit if possible so that you can run the fan at lower speeds. It’s better to have more power and not need it than to need more power and not have it.
You’ll also want a higher CFM to compensate for the addition of a carbon filter. Some people may suggest that a carbon filter is optional but I wouldn’t grow without one. The next section will go into greater detail on carbon filters but their main function is to filter out the stinky air exiting your tent so that your neighbors aren’t privy to your business.
Carbon filters reduce the CFM of your fan by up to 60% because the fan is inhibited by having to first pull air through the filter and then out of the tent. Ductwork will also reduce the efficiency of your fan by about 20%.
To figure out what the true CFM requirements of your space are you would multiply your baseline CFM by the efficiency percentages of your added equipment. So in our example of the 4x4x8 tent you’d have a baseline CFM of 128. Multiply 128 by 60% for your filter and then 20% for your ducting and you’d wind up with a requirement of 246 CFM.
But you also have to account for the heat from your light. An LED grow light will reduce CFM efficiency by up to 50%. So if we continue with our example, we will need a CFM of 369 for a 4x4x8 tent with a light, carbon filter, and ductwork.
So which brand fan should you go with? I recommend AC Infinity fans to everybody I talk to and they’re probably the most popular fan company in the game right now across the industry. Using the example of our space above, their T6 series fan would give us a CFM capability of 402 and would be suitable. Their fans are SUPER quiet and come with a really cool controller that doubles as a thermometer/hygrometer. Definitely worth checking out.
Carbon Filters
While carbon filters might not be the most exciting part of your grow setup, they are a crucial addition. A good filter will keep the stinky goodness you’ve been cultivating under control and will keep nosy neighbors and potential thieves out of your business. They can also help keep your partner or roommates happy if they’re hesitant about your new hobby and don’t want to smell your weed all day long.
This is another area where you definitely don’t want to cheap out. If you buy a cheap filter, chances are you’ll be replacing it way sooner than you would have had you just spent a little bit more up front. I’ve played the game of trying to cheap out on equipment and always wound up spending more in the end when I realized I bought a bunch of garbage and had to buy the good stuff after the fact.
With that said, you also don’t need to spend a ton of money on a filter! Out of all the filters I’ve tried, the TerraBloom filters seem to be the best as far as efficiency and price point. I’ve used their 16 inch long filter with the 6 inch flange for almost two years and it’s still effective. I would recommend changing your filter at least every two years but for the price of the TerraBloom it’s extremely affordable. Phresh filters and Can-Filters are two really great options as well but are a bit more pricey. If you’ve got cash to spare, I might choose the Phresh filter over the Terrabloom, but you’ll be happy with either one.
When setting up your carbon filter in your tent you want to make sure that you set it up with your in-line fan in the correct direction so that the fan is pulling air through the carbon filter. You’ll also want to ensure that all ducting connections are tight and sealed so that un-scrubbed air doesn’t bypass your carbon filter allowing smelly air to escape.
Let’s Grow Already!
Alright! Now that you’re well on your way and have a suitable environment to grow your plants in, let’s get to the point of this all: growing some kickass weed. In the next editions of the Homegrow LI Grow Guide we’ll be narrowing our focus on seed germination and raising seedlings.
Let’s get them seeds in the dirt!
And if you haven’t already, you are welcome to join Homegrow Long Island Grower’s Circle, our private online community of at-home cannabis cultivators growing and learning together.
If you have any questions about the information contained here, please feel free to leave a comment below for our community to learn from or contact us directly via email.
Use the buttons below to share this blog on social media with your friends and family.
Disclosure: Some of the links on this site are affiliate links, such as Amazon links. I may make a small commission from purchases made through some of those links, at no extra cost to you. I only link to products that I would personally use and that I believe are of the highest quality. Any purchases made through affiliate links enable me to continue creating content for this website and are greatly appreciated!