
Cannabis plants, if left to their own devices, will grow straight up as tall as they can in order to take in the maximum amount of sunlight. But when we’re growing indoors, we’re working with limited head space and with artificial lighting that is nowhere near as strong as the sun. Outdoors, the sun is such a powerful light source that it can penetrate deep into a plant’s canopy and thusly maximize photosynthesis and bud production in lower and inner branches of a cannabis plant.
LED grow lights, while great for providing powerful light to the top of an indoor plant’s canopy, produce light that rapidly drops off in intensity as it travels further from the diodes. This leaves us with a light source that doesn’t have a lot of deep penetration capability. And if we allow our plants to grow straight up, the lower and inner branches of the plants will not produce the dense, trichome-laden, high quality buds we’re looking for. Instead, you’ll wind up with a bunch of “larfy,” airy, fluffy buds that will make everyone on Facebook groups and Instagram pages laugh at you. We can’t have that. You have an ego to defend god damn it!
But seriously, you don’t want to waste your time growing larf. It’s disappointing, annoying to trim, and a waste of resources.
What we need to do is break the natural apical dominance of our plants. We need to encourage our cannabis plants to grow outwards instead of upwards. This way we can maximize yield potential by ensuring that all branches of our plants get close to the same intensity of light.
So how do we do that? We start by topping our plants.
Topping
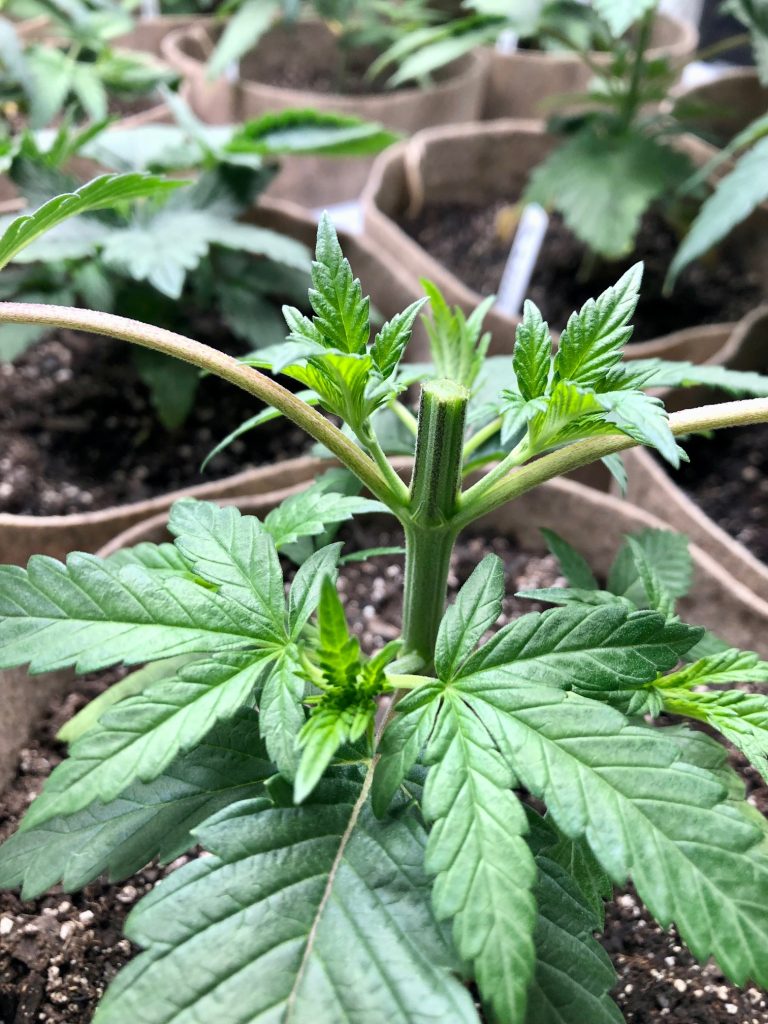
Topping is a simple yet psychologically intimidating procedure to perform for first-timers. It’s just one cut with a pair of scissors but you may feel like you’re betraying your plants by mutilating them in this fashion. Just get over that. After you make this cut, these plants are gonna EXPLODE with new growth. You’re gonna feel like a god. YOU control their destiny. They owe EVERYTHING to you. So show them who’s boss and get in there with those scissors.
In the picture above, you can see where I made the cut. I cut the main stem a quarter inch above the associated node. You should be able to identify the main stem that’s been cut, the two shoots just below that cut, and the stems of two fan leaves growing from that node. Those two shoots that you see growing at the top are now the tops of my plant. After topping, my plant now has two main tops instead of one and apical dominance has been broken.
Preparing To Top And Making The Cut
Firstly, you will want your plant to grow to at least 5 nodes before you top it (in case it’s not clear, nodes are points along the main stem where branches grow out from). Waiting until your plants have 5 nodes ensures that they have robust enough root systems to handle the stress of being cut down.
You’ll also want to do the topping procedure on a watering day. It’s best to water your plants right after doing any sort of pruning such as topping. We’re pruning the top of the plant to encourage lateral growth.
When you’re ready, get a sharp, clean pair of scissors and sterilize them with 70% rubbing alcohol before making your cut. Taking this extra precaution is a preventative measure to stop any pathogenic microbes from infecting your plant. Do your best to sterilize between every cut. It’s better to be safe than sorry.
Count up three nodes on your plant and snip the main stem a quarter inch above the third node. In other words, cut off and remove the two top nodes leaving the third node intact and being careful not to damage the two growth tips emerging from it.
Technically, you can top at any node on the plant and still wind up with two tops, but we choose to cut at this point in order to keep the plants short and also to create a manifold structure, which I will describe later in this article.
After topping your plant, focus your attention now on removing foliage from the first node, the one directly above the soil. Clipping the leaves from this node will allow you more room to water, feed, and provide maintenance to your plants. A more advanced technique called manifold training requires the removal of even more foliage but, first, I want to discuss low stress training and supercropping.
Low Stress Training
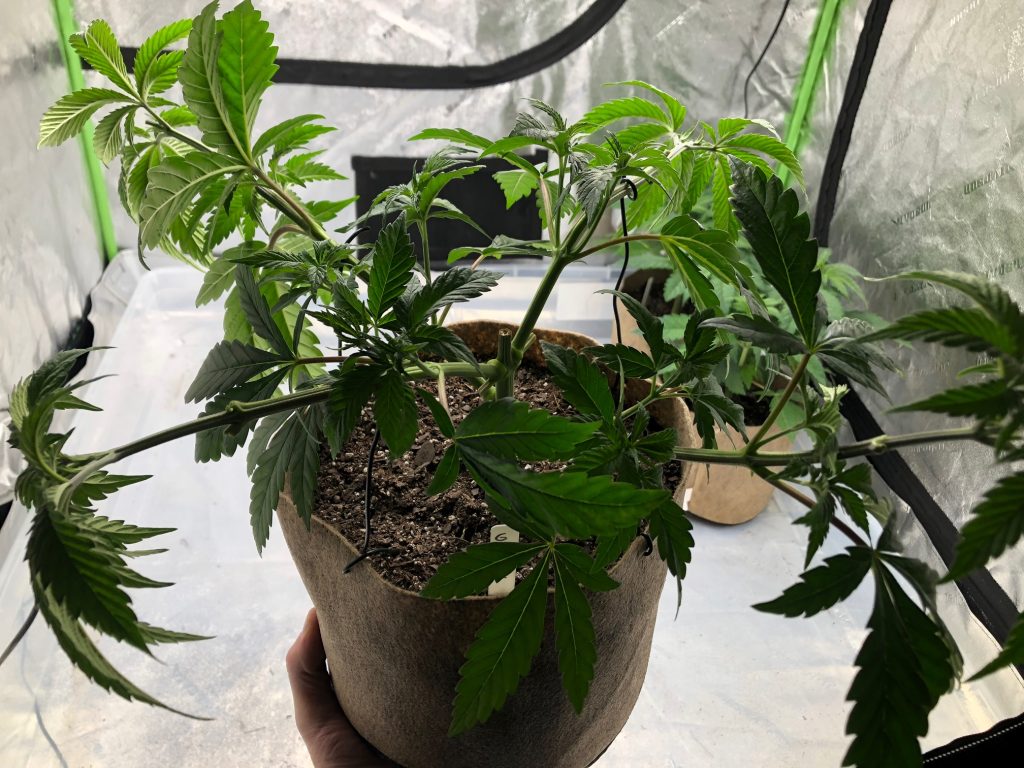
Simply put, low stress training (LST) involves tying a piece of plant wire around a branch of a plant, carefully bending the branch downward to a horizontal position, and then tying the other end of the plant wire to the fabric pot. Using LST, we are able to open up the interior portion of the plant to the light and encourage all of the bottom branches to grow up to the same height as the main tops. By growing the plants horizontally and getting the bottom growth to reach the top of the plant canopy, we can achieve a harvest of uniform, high quality buds instead of having a plant with one main cola and a bunch of underdeveloped buds on the bottom.
You can begin LST as soon as your branches are tall and sturdy enough to bend down. You’ll also want to perform LST when the branches are young. As branches age and thicken, they become more woody. Attempting to bend woody stems can cause them to snap or split. IF you do manage to snap a branch, don’t sweat it. As has been stated before, these plants are highly resilient. Snapped branches can often be fixed with a piece of electrical tape or painter’s tape. Just wrap up the injuries and leave them alone. Most branches will be just fine even after being injured. Sometimes we even injure branches on purpose…
Supercropping
Supercropping is a form of high stress training that involves forcing branches to grow horizontally by softening the stems with your fingers and then bending the plant over at a 90 degree angle at that point. It’s basically snapping branches to achieve a flat canopy shape like we do with LST but without having to tie the branches down with plant wire.
Most new growers steer away from supercropping as it’s considered a more advanced method of training and comes with a bit of anxiety from intentionally damaging your plants. With that said though, it’s really not as intimidating as it seems and has the added benefit of strengthening branches as they form hard knuckles where the injury occurs. These knuckles help to hold up heavy buds later on in flowering. On top of that, supercropping eliminates having to deal with plant wire that’s tied all around your pots which can be pretty annoying when trying to water or feed your plants.
If you’re feeling adventurous, try supercropping just one branch on your least favorite plant and observe what happens. After seeing how easy it is, you’ll feel more confident to try it out on your other plants. And if you don’t want to try it at all, that’s ok too! You can achieve great results using LST alone and both methods will result in high quality yields.
To supercrop, pick a point along your selected branch where you would like to train it horizontally. Using two fingers, pinch the stem at that point and gently roll it between your fingers to soften it up. You basically want to soften the interior of the stem without breaking the outside of the stem. After you’ve softened it up a bit, just bend the branch over at a 90 degree angle and move on with your life. When you check on the plant the next day, you may even see that the branch has corrected itself almost back to it’s original orientation. Sometimes you’ll have to bend a branch a couple of times to maintain your desired shape.
Manifold Training
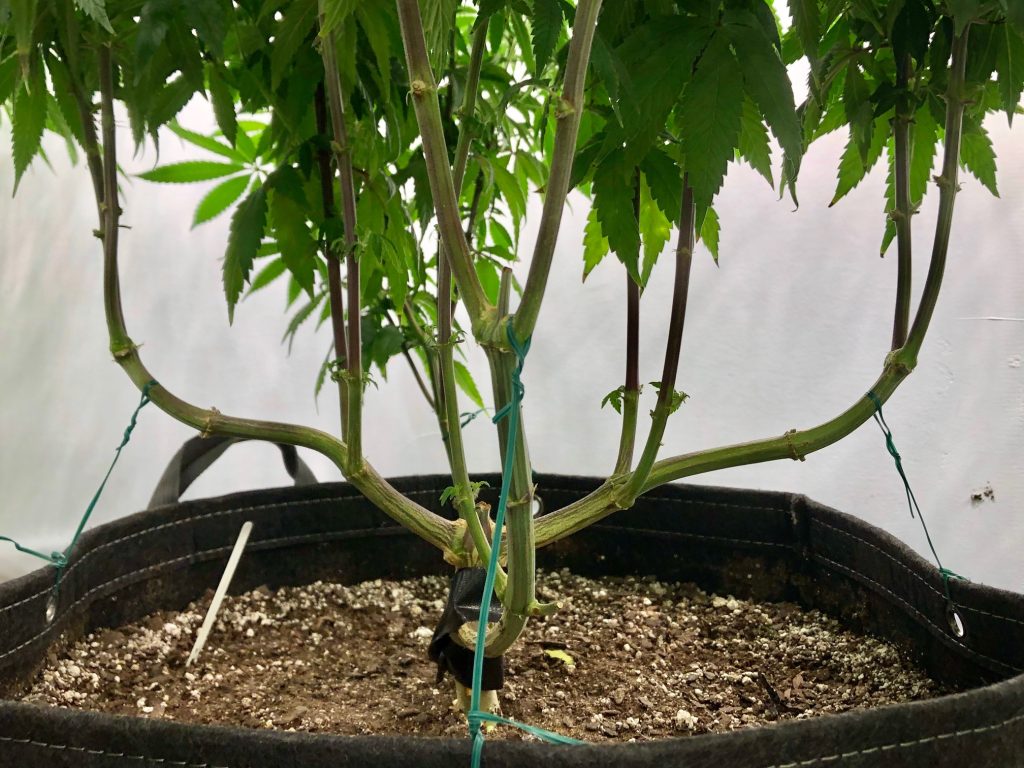
Cannabis manifold training is a style of pruning and training used to create eight main colas on a single plant. It involves a strategic sequence of topping and node development outlined below.
1. Form the base of your manifold.
- Let your plant grow to 5 nodes tall
- Top plant just above the third node (count from bottom up)
- Remove all growth below it
- Now you are left with two main shoots at the top
2. Allow two main shoots to grow to four nodes each. Then:
- Top both shoots above the third node
- Remove all growth from the second nodes of each main shoot. This creates space within the plant to avoid overcrowding later.
- You will now have 8 main tops total
Once you have your manifold shaped, continue to implement LST and/or supercropping as the plant grows and try your best to maintain the plant in a horizontal growing fashion.
Pruning
As your grow progresses, you’ll want to clean up the bottoms of your plants occasionally, sometimes referred to as “shaving the legs” of the plants, by stripping all branches that will not reach the top of your canopy. This will free up space to create airflow on the interior of your plant and prevent issues such as powdery mildew. Low branches that don’t stand a chance of reaching the top of the canopy will only produce fluffy, low quality buds and are a waste of resources. So just get rid of them.
People will also sometimes refer to this practice as “lollipopping”. You’ll basically have a stem like a lollipop stick with the uppermost part of the branch containing the buds. I recommend not going too extreme with this. You want to aim for having 12 inch tall colas on each branch. Don’t cheat yourself by leaving 4 inch colas with nothing but a bare stalk under it all.
On your first attempts at growing, I recommend being more conservative in your pruning practices until you get a better idea of what you want to eliminate on your next grows. It’s better to take off less than you intend than to go crazy and strip your plant bare. You can always take more off but you can’t put it back on.
You may also hear a lot of people talking about defoliating their plants by removing a large portion of the large fan leaves. Don’t do that. With organic cultivation, the leaves act as nutrient sinks for the plants to draw on later in the flowering cycle. If you strip your plants of these fan leaf nutrient sinks, you will wind up with nutrient deficiencies later in flower and yields can be diminished. Again, be conservative and only remove leaves if your plant is crowded on the interior.
Conclusion
Don’t worry about understanding everything right off the bat. A lot of these practices will make total sense to you once you’re in the process of growing. Just like anything else in life, take the first steps forward one by one and you’ll develop your skills over time.
Remember, you can also choose to forgo all training and just grow the plants to see what happens! I sometimes recommend to people who seem a bit intimidated to just let the plants grow and observe the process. You’ll still wind up with usable buds at the end and you’ll be better able to visualize what you want to do with your next grow.
In Part VI of the Homegrow Long Island Grow Guide we will initiate flowering and discuss how to care for plants during their 7-10 week flowering cycle.
Click here Homegrow Long Island Blog for other installments of the Homegrow LI Grow Guide and to read about seeds and soil, containers and grow lights, equipment needed for your high-efficiency indoor cannabis growing set-up, as well as seed germination and seedling care.
And if you haven’t already, you are welcome to join Homegrow Long Island Grower’s Circle, our private online community of at-home cannabis cultivators growing and learning together.
If you have any questions about the information contained here, please feel free to leave a comment below for our community to learn from or contact us directly via email.
Use the buttons below to share this blog on social media with your friends and family.
Disclosure: Some of the links on this site are affiliate links, such as Amazon links. I may make a small commission from purchases made through some of those links, at no extra cost to you. I only link to products that I would personally use and that I believe are of the highest quality. Any purchases made through affiliate links enable me to continue creating content for this website and are greatly appreciated!
I was looking for information on exactly these techniques, thanks.